Dlink
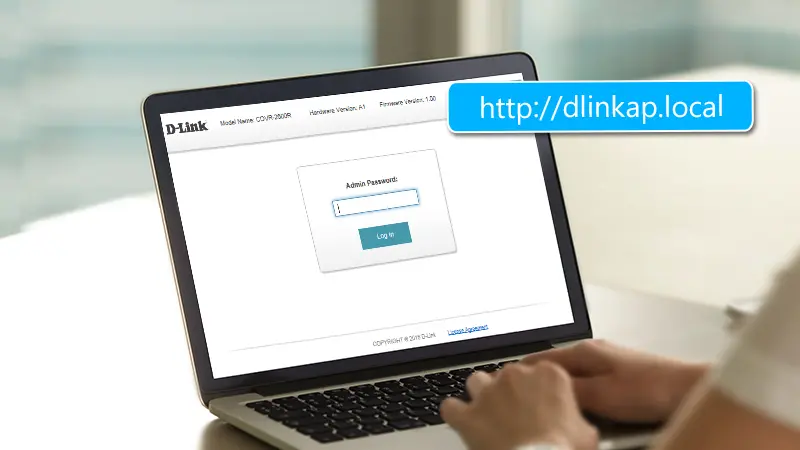
What is http://dlinkap.local?
For configuring D-Link wireless range extenders, use the dlinkap.local web address to access the web-based interface. The coverage and efficiency of an existing Wi-Fi network can be improved by users by configuring, managing, and optimizing the settings of their extender through this interface, including network name, security settings, and firmware updates.
How to Login to Dlink Extender?
To access a D-Link extender using a log-in:
- Make sure the Wi-Fi network on the extender is linked to your device.
- Open a web browser on the device that’s connected.
- In the browser, type http://dlinkap.local or the IP address of the extender and hit Enter.
- The login screen for the D-Link extender will show up.
- Enter the password and username that are set up for you, or enter your own.
- To enter the configuration interface of the extender, click the Login button.
- To improve the performance of your network, change the parameters as necessary.
- For security reasons, always update the default login information.
Using http://dlinkap.local Web Address
The dlink login page for the Dlink extender will open when you type http://dlinkap.local into the address bar of the browser. Installing and configuring your extender may be done mostly using the dlinkap.local login page. Should an error message appear, it indicates that No connection has been detected.. Make sure the client device is linked to the Dlink network wirelessly or via an Ethernet connection to prevent any errors.
Taking care of the following matters is necessary before you can access the Dlink login page:
- Your router and extender are required to be in the same room.
- Keep your details of login ready.
- You can use the default login details of extender.
- Your device must be well linked to the dlink extender.
Steps Required For http://dlinkap.local Login
You can view the Dlink Login Page by using the web address http://dlinkap.local. Visiting the dlinkap.local page will make it simple for you to set up the Dlink extender on your PC. if you are looking for the ways then you must follow the instructions mentioned below:
- First and foremost step is to validate that a power source is connected to your Dlink extender. Verify that it is maintained in the same configuration as your current wifi router.
- Proceed to link your computer, either wirelessly or with an Ethernet connection, to the Dlink wifi network.
- Enter http://dlinkap.local into the address bar of your preferred web browser after you’ve registered.
- Inputting the IP address 192.168.0.50 into the web browser will also go to the Dlink extender login page.
- You can now view the http dlinkap local login page after that. Input the Dlink extender’s passkey and login credentials.
- The setup screen for dlinkap.local will appear when you click “Login.”
Using IP Address
- Once connected, launch a web browser on your computer.
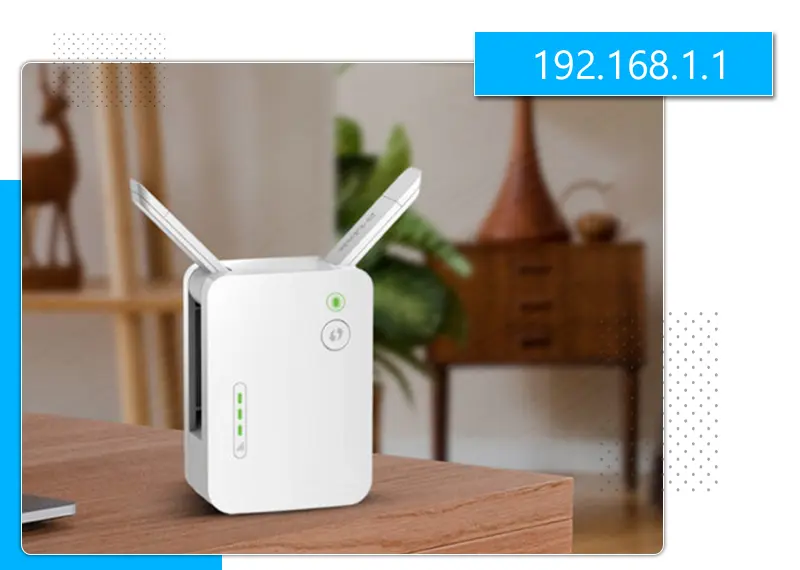
- Type either 192.168.0.1 or 192.168.1.1 into the browser’s address box, then hit Enter. Instead of typing the default gateway address, you can alternatively try typing http://dlinkrouter or http://dlinkap.local
- You will be sent to your d’link extender login screen, where you must enter your password and login username to move forward.
- Passwords are not needed because the username is admin by default. It is possible to log in with the default credentials if you haven’t changed the admin login username and password. Your router may include a label on the side or back that contains the default login information.
- You can also search the internet for the default login credentials for your particular router model.
- Log in to your D-Link router by entering the login information.
- Once you’re logged in, you may adjust every configuration on your router and WiFi network.
How to configure the dlink extender?
Through the instructions in this area, you will gain a deeper understanding of the procedure. To assist you with the D-Link wifi range extender setup process, we have included some basic instructions below.
- Set up the hardware connection after removing the D-Link wifi range extender from the box.
- A hardware connection must be established in order to configure a D-Link wifi range extender. Make use of the Ethernet wire to link the gadget to the PC.
- After that, insert the extender into the power outlet and watch for the gadget to switch on.
- Navigate to the PC linked to the D-Link wireless range extender’s wireless network.
- Start up any online browser you choose, such as Chrome by Google, Firefox by Mozilla, and Edge from Microsoft. If you look at the top of the website, you will see an address bar.
- You’ll be given the option when entering your username and password when the D-Link login window appears.
- This will open the D-Link wifi range extender setup wizard. Type your login information into the appropriate sections and select the login tab.
- Locate and choose your home wifi network from the list of active networks that appears after scanning for them.
- When prompted, input the network’s security key and establish a connection.
- After finishing the instruction, adjust the wireless settings.
- To activate the device as a wifi range extender, adhere to the setup guidelines.
Troubleshooting the Common Dlink Extender Login Issues.
Your browser will open the Dlink Extender Login page when you input dlinkap.local. Installing and configuring your extender may be done mostly using the dlinkap.local login page. Should an error message appear, it indicates that No connection has been detected.Making sure the client device is wirelessly or via an Ethernet connection connected to the Dlink network is required for preventing failures of any kind.
Dlink Extender Setup is a straightforward process, as was previously said.But there are some circumstances when You can run into trouble while using your Dlink extender. The following troubleshooting advice can be used if you’re experiencing problems with your device during the installation of the Dlink extender.192.168.0.150 not functioning, D-Link not connecting, and dlinkap.local not working
Tip 1: Verify that you are in your router’s range. The Dlink extender needs to be positioned close to the router during the first setup.
Tip 2: Verify that the Dlink network is established between your computer and it. The dlinkap.local setup wizard cannot be accessed without a connection.
Tip 3: If 192.168.0.150 is not functioning, check the login information you entered.If this is your first time logging in, use the default login information
Tip 4: Consider using a different web browser. An outdated web browser may be the cause of the dlinkap.local error.
Tips 5: If your D-Link extender is still not interacting, you can reset it to its factory settings and restore it to its original configuration.

Solutions for Failed Dlink Login Attempts.
\We’ll go over some fundamental methods here that should help you fix your Dlinkap.local Login problem:
- When your range extender is plugged out of the electrical outlet, give it at least two minutes to wait.
- Switch it on once more now.
- Re-energize your modem and router.
- Try to reconnect the D-Link extender once more after restarting.
- Proceed to the next section of the solution if, after trying these, the problem still cannot be solved.
- It’s possible that you’re trying to log in to D-Link Extender by following the incorrect steps or instructions.
- If you’re not sure which D-Link extender login step is best for you, don’t worry. Move forward without hesitation to the following part and use the procedures below to log in to your D-Link extender.
How to Reset the http://dlinkap.local not Working?
Resetting your extender is the best course of action if you are unable to establish a connection using Dlinkap Local. The procedures to reset your Dlinkap are as follows:
- Before resetting it, make sure the D-Link extension is turned on.
- Please do not connect the extension to the power supplies while doing this procedure as this may cause damage.
- Employing a paper clip, push the “Reset” button situated at the rear of the extension for no more than 10 seconds.
- Shortly after turning on the extender’s LEDs, release the button.
- Consequently, after being reset, the D-Link extender will reboot.
- The factory default settings for each configuration choice have been restored.
Why is Dlinkap.local not working and how to fix it?
You might not be able to access the Dlinkap.local setup page because of problems with the default gateway being configured. Their solutions have several drawbacks, including:
- Simply verify that the extender is correctly connected to the router by checking the cable connection. Make that the power connection is working as well.
- Alternative options include turning off malware and antivirus programs. This program has a temporary disable option. It’s possible that they will prevent you from accessing the login page.
- For the extender login procedure, make sure you enter the correct login credentials.
- Finally, make an effort to maintain Dlink extender firmware update
- Configurations and Features for Advanced Settings
- MAC filtering, DHCP settings, and other complex settings explained.
- adjustments to advanced settings provide advantages.
Advanced Settings and Features
MAC Filtering and DHCP Configuration on a D-Link Extender
For controlling network access and IP address distribution within your home or office network, filtering MAC addresses and DHCP settings constitute essential elements. A quick tutorial on configuring these settings on a D-Link router can be found here:
The MAC Filtering
Controlling network access based on device hardware addresses can be accomplished by MAC (Media Access Control) filtering, a security mechanism.
For a D-Link router to be configured with MAC filtering:
- Input the login credentials for the router: Using a web browser to input the router’s default Internet Protocol (IP) address, which may be 192.168.0.1, for accessing the online user interface. Enter your login name and username and password (administrator is usually the preferred one, unless you’ve updated them).
- MAC Filtering Preferences View and Edit: The MAC Filtering feature can be found after choosing the Advanced option. Under Wireless Settings, Networks Filter, or another section, you can locate something identical.
- Incorporate MAC Addresses: Activate MAC filtering after deciding whether to allow or prohibit access to the devices in the list. Choose which device MAC addresses you want to allow or ban through typing them.
- Maintain Configurations: Once you’ve saved your modifications, restart the router if necessary.
DHCP Settings
The Dynamic Host Configuration Protocol, or DHCP, makes handling gadgets easier by automatically assigning IP addresses to all devices that are connected on the network you are accessing.
On a D-Link router, to configure the DHCP settings:
- Enter the router’s login credentials: Log in with a web browser employing the router’s IP address.
- Gain access to the DHCP settings: Navigate to the Setup tab and choose Network Settings. Go to the DHCP Server settings by scrolling down.
- Turn on or off the DHCP server while configuring it. You have the ability to configure the lease time, DNS, gateway, and the range of IP addresses that the DHCP server can assign (from Start IP Address to End IP Address), if it is enabled.
- Save Configurations: Click Save Configurations to make changes effective after modifying your DHCP settings.

FAQs
After connecting to the network via your device’s Wi-Fi settings, plug in your D-Link extender to a power outlet and proceed with the setup actions on the web interface or app.
You can use a web browser to access the default IP address of most D-Link extenders, and this is 192.168.0.50.
Aim for the ideal distance between your extender and the router; excessively close proximity might result in ineffective range extension, and excessively far might weaken the signal.
After resetting the extender by holding down the reset button for around ten seconds, reconnect it by going through the normal setup process to join the network of the new router.
Enter your router’s Wi-Fi credentials manually to create a connection after accessing the extender’s settings via its IP address in a web-based browser.