Dlink
Dlink Wifi Extender Setup
By boosting the strength of the current Wi-Fi signals, D-Link Wi-Fi extenders improve coverage in places with spotty internet. In order to configure the extender, you must plug it into a power outlet, connect to its network, open a web browser to access the dlink wifi extender setup interface, and make configuration choices including choosing the Wi-Fi network that already exists and inputting its password. Devices can join to the expanded network after it is set up, giving the house or workplace more coverage.
Requirements for Dlink WiFi extender setup
dlink wifi extender setup usually requires the following things:
- D-Link Wireless Extender: Verify that you own the actual D-Link wireless extender equipment.
- Wi-Fi Network: An already-existing network that you wish to expand within your house or place of business.
- Power Outlet: The ability to attach the extender to power.
- Accessing Device: To access the setup interface of the extender, use your device.
- Network Information: Your current Wi-Fi network’s name (SSID) and password.
- User Manual: While it’s not technically required, having the user manual on hand can be useful when trying to solve problems or locate certain setup instructions.
You should be ready to install your dlink wifi extender setup and enhance your wireless coverage after you have these things ready.
How to setup the dlink extender
How to Setup D-link Extender via WPS method:
- The steps are as follows:
- First, connect the power outlet of your D-Link Wi-Fi extension to it.
- Then, verify if it’s within your current Wi-Fi network’s coverage area.
- Now, look for your D-Link extender’s WPS button.
- Subsequently, may have the word “WPS” written on it or a symbol that looks like two arrows arranged in a circle.
- After this, hit this button.
- Similarly, this button could be found within the router’s settings menu or on the router itself.
- Here, extender will establish the link.
- The extender’s LED indicators should indicate a successful connection once it has been made, either solid or flickering.
- Then link the devices to check the network.
- Utilize the network name (SSID) of your current Wi-Fi network, with the suffix “_EXT” appended by default.
- If you’d like, you may modify the extended network’s password and network name (SSID) by logging into the extender’s settings interface.
- You may quickly and simply set up your D-Link Wi-Fi extender using the WPS technique by following these steps, which will improve the Wi-Fi coverage in your house or place of business.
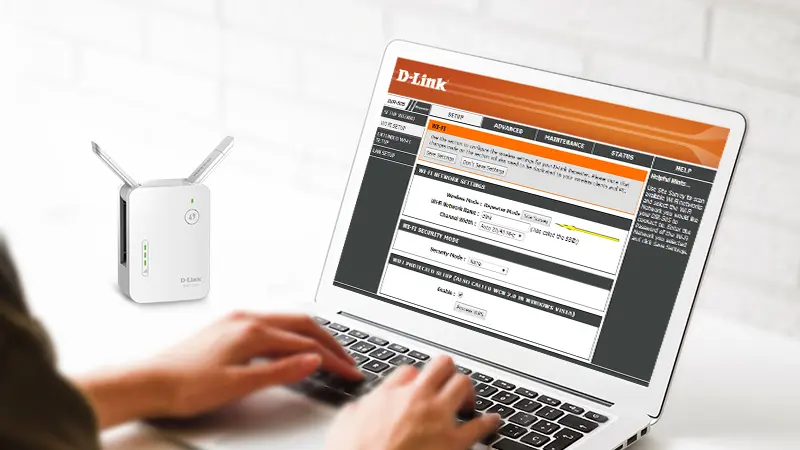
How to Set up D-Link Extender via a Web-browser:
Using a web browser, you may configure your D-Link Wi-Fi extender by gaining access to its setup interface and making changes to its settings. Here’s a detailed how-to:
- Firstly, Make sure your D-Link Wi-Fi extender is turned on and plugged in.
- Then connect your device.
- Usually, this network will be called “D-Link-Extender” or something like that.
- After this launch a browser.
- Subsequently, pass in the dlinkap.local setup address or IP address.
- Usually, this is “192.168.0.1” or “192.168.0.50”.
- The user manual for the extender or the D-Link website both have the IP address, if you’re not sure what it is.
- Once the dlinkap.local setup page is accessed, a login prompt will appear.
- Then make use of the standard login credentials.
- Resetting the extension to its factory defaults can be necessary if you’ve altered these credentials in the past and are having trouble remembering them.
- You will normally be taken to the extender’s setup process after logging in.
- Hereafter, use your login details.
- To change the network, simply follow the d’link setup wizard. Additionally, you can have choices for more complex settings like channel selection and security settings.
- Now save your modifications after making any necessary configurations.
- After that, the extender may restart and implement the adjustments.
- Reconnect the extended network using the new details, if you modified them, when the extender has rebooted.
Note: Now that your D-Link Wi-Fi extender is configured, your house or place of business should have expanded Wi-Fi coverage.
Common D-Link WiFi Extender Setup Issues and Troubleshooting
Unable to Connect to the Extender’s Network
Here are some troubleshooting methods to try if you’re having problems connecting to the network of your D-Link Wi-Fi extender:
- Make that the extender is positioned such that it can connect to your current WiFi network.
- Consider relocating it nearer the router.
- Make sure the Wi-Fi settings on your device are set up properly to connect to the network of the extender.
- Try returning the extension to its factory settings if everything else fails.
- Push down the knob.
- It might be possible to fix connectivity problems by updating the firmware.
- If after following all the above instructions you are still unable to connect, get in touch with D-Link support for more help.
- You should be able to troubleshoot and fix problems connecting to the network of your D-Link Wi-Fi extender by following these steps.
Unable to Access the Web-based d link extender Setup Page
Try the following troubleshooting steps if you can’t get to dlink wifi extender setup page:
- Join the network through the extender.
- Verify again that the IP address you’re supplying on the extender’s configuration page is correct.
- Put the dlinkap.local setup address.
- You can use the d’link setup wizard.
- Try visiting the setup page once more after clearing the cache, cookies, and browsing history in your web browser.
- To rule out compatibility difficulties, try diverse browser or device to access the dlink wifi extender setup page.
- Any firewall or antivirus software on your device may be preventing access to the setup page, so turn it off for the time being.
- Try accessing the dlink wifi extender setup page again by resetting the extender if everything else fails.
Incorrect Password Error
Try the following troubleshooting steps if you’re seeing a “incorrect password” error when attempting to connect to your D-Link Wi-Fi extender:
- If your dlinkap.local not working then you can use an IP address.
- Make that the Wi-Fi password you’re using on the extender’s network is correct.
- Because passwords depend on their case, make sure all capital letters are spelled correctly.
- Verify that the network settings on the extender and your device correspond with the security type (WPA, WPA2, etc.).
- You can reset the extension to its factory defaults if you’ve forgotten the Wi-Fi password or fear it has been changed. Pin or paperclip the reset button and hold it there.
- Reconfigure the network settings of the extender after restarting it, making any necessary changes to the Wi-Fi password.
- Get in touch with D-Link support if you’re still having problems so they may help you resolve the password error further.
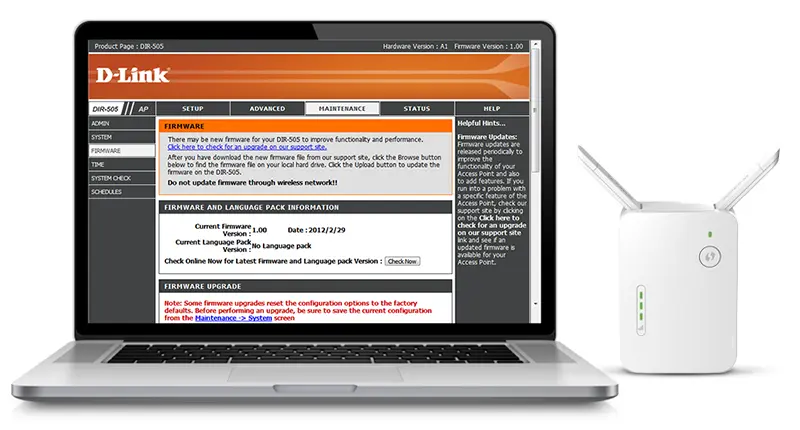
Firmware Issues
Your D-Link Wi-Fi extender may have firmware faults that result in a variety of connectivity and performance issues. Here’s how you respond to them:
- Check the apprises for firmware.
- Firmware updates frequently fix identified problems and increase stability.
- Download the most recent firmware version from the D-Link website that is compatible with the model of your extender, if updates are available. Installing the firmware upgrade requires adhering to the given steps.
- Try restoring the extender to fix the problem. Sometimes, this resolves chronic issues with the firmware.
- After upgrading or resetting, if you still encounter firmware problems, get in touch with D-Link support for more help and situation-specific troubleshooting instructions.
FAQs
1.How do I reset my D-Link extender?
Trace the reset knob on it. After putting a paperclip or pin in the opening, hold down the reset button for ten seconds or so. When the LED lights begin to blink, signaling that the reset procedure has started, release the button. Change the details after reset and execute d link extender setup again.
2.What should I do if my extender isn’t showing up during the setup process?
Try the following actions if your D-Link Wi-Fi extender doesn’t show up during setup:
- Attach the extender to the power.
- Turn on the wifi device.
- Bring your gadget nearer to the extender to guarantee a robust Wi-Fi connection.
- Try setting up an alternative device if at all possible.
- Execute the d link extender setup again.
3.Can the D-Link extender work with any router?
D-Link Wi-Fi extenders are typically compatible with routers made by other manufacturers, provided that the routers accept the standard Wi-Fi protocols (802.11a/b/g/n/ac). However, using a D-Link extender with a D-Link router is advised for best results. Depending on particular models and firmware versions, compatibility may differ. To make sure the extender is compatible with your router before making a purchase, review the d link extender setup compatibility list or refer to the specs.
4.Why can’t I access the extender’s setup page via the URL provided in the manual?
There are a few possible reasons why you might not be able to reach the d’link extender setup using the given URL:
- Input the right address in the browser bar.
- Setup the linking of devices.
- Consider utilizing an alternative web browser to view the d’link extender setup page.
- Turn off any firewall or antivirus software for a short while as it might be preventing access.
- Reset the extender and attempt to reach the configuration page once more.
5.How can I improve the performance of my extended Wi-Fi network?
To augment your extended Wi-Fi network’s performance:
- Placing the extender is the most effective thing.
- Look for network congestions and fix them.
- Update the firmware on your router and extension to guarantee compatibility and boost performance.
- QoS, or quality of service, Set bandwidth-consuming activities in order of importance to maximize network performance for critical tasks.
- Upgrade to a mesh Wi-Fi system for better performance and seamless coverage throughout your house or place of business.